Can You Cut LED Strip Lights
LED strip lights have quickly become a favorite for DIY lighting projects, adding flexibility, modern aesthetics, and practical illumination to any space. Their flexible nature allows them to adapt to different applications easily. But a common question many people have is: Can you cut LED light strips? The answer is yes! In this comprehensive guide, we'll show you exactly how to cut LED light strips safely and effectively, ensuring they work perfectly for your custom lighting setup.
Why Would You Cut LED Light Strips?
Cutting LED light strips, such as RGB LED strip lights or white LED strip lights, helps you create a customized lighting solution by allowing you to adjust the length to fit shelves, kitchen counters, or accent lighting in your car. This process maximizes the versatility of LED strips and ensures they fit your project perfectly, adapting to any required length or shape without compromising functionality. Properly cutting these LED strip lights allows you to make the most of their adaptability and ensures a perfect fit every time.
How to Cut LED Light Strips: Step-by-Step Guide
To safely and effectively cut LED light strips, follow these steps:
Step 1: Locate the Cut Marks
Before making any cuts, inspect your LED strip for cut marks. These marks are usually indicated by a line or a pair of copper pads and are spaced evenly along the strip. Remember, you cannot cut the strip just anywhere; it must be at these marked points to avoid damaging the circuit. It is essential to cut precisely at these marked points to ensure that the strip continues to function properly.
- Tip: Always refer to the manufacturer's instructions, as cut lines can vary between products
Step 2: Gather the Right Tools
You'll need a few tools to get started:
- Sharp scissors or a utility knife: To make a clean cut.
- LED strip connectors: If you need to reattach segments or make corners.
- Soldering kit (optional): For a secure connection when connectors aren't available.
- Measuring tape: To ensure precise cuts that fit your space.
Step 3: Power Down the LED Strip
Safety first: Make sure the LED strip is powered off and unplugged from any power source before cutting. Cutting a live strip could damage the LEDs or lead to electric shock.
- Tip: Lay the strip flat on a secure surface before cutting to ensure accuracy
Step 4: Make the Cut
When cutting the LED strip, it is crucial to cut only at the designated points, usually marked with a scissor icon or a pair of copper pads. Cutting at these points ensures you do not damage the flexible circuit board, which can lead to short circuits or cause the LED strip, whether RGB or other types, not to light up.
- Inspect the Strip: Look for visible copper pads or scissor icons on the strip. These indicate where it is safe to cut. If the strip has no scissor icon, try to identify the breakpoint between two LED modules, which is often a safe place to cut.
- Use the Right Tools: Make sure to use sharp scissors or a utility knife to make a straight and clean cut, avoiding any burrs that could cause short circuits or poor electrical contact. When cutting, always ensure you leave enough copper at the connection point for soldering or attaching connectors later on.
- Cut Carefully: Depending on the density of the LED beads, adjust your approach:
If LED beads are densely packed: Consider sacrificing one section of the strip to leave enough space for the connector to properly attach to the copper pads.
If LED beads are sparse: Cut precisely at the marked points to avoid any unnecessary waste
Avoid Incorrect Cuts: Cutting in the wrong place or leaving insufficient copper can damage the electrical circuit, causing part of the strip to malfunction. Ensure you leave copper pads on both sides of the cut for ease of reconnection, making it simpler to reconnect the segments later on.
- Tip: If using a utility knife, use a ruler to guide the cut for extra precision. Cutting anywhere else or leaving insufficient copper can damage the electrical circuit, causing part of the strip to malfunction. If the LED beads are too densely packed, consider sacrificing one section of the strip to leave enough space for the connector to properly attach to the copper.
Step 5: Reconnect or Install the LED Strip
Once you have cut the LED strip, make sure that the positive and negative connections are aligned correctly when reconnecting. LED strips typically have a clear '+' and '-' marking. When reconnecting with connectors or soldering, make sure the positive terminal connects to the positive and the negative to the negative to avoid malfunction.
1. Align positive and negative terminals correctly: Make sure the positive and negative terminals are properly aligned; incorrect alignment will cause the LED strip to fail to light.
2. Double-check connection points: Always verify the connections before powering on the strip to prevent potential damage.
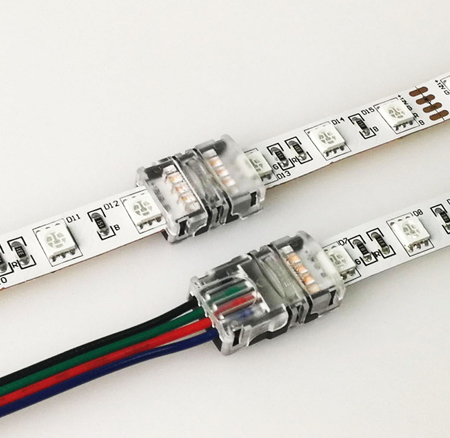
To illustrate this process, we will upload two images: one showing the LED strip connected with wires and another showing it connected to other LED strips using connectors. This visual guide will help demonstrate how to properly connect different segments. For more information, visit our website and learn about LED Strip Solderless Connectors.
- Tip: Ensure the correct alignment of the positive and negative terminals to avoid malfunction.
- Tip: Verify all connection points thoroughly before powering on to prevent damage to the LED strip or connectors.
If you need to reconnect your LED strip or attach it to other segments, you can use LED strip connectors. These snap-on connectors allow you to join pieces easily without the need for soldering. For a more permanent and secure connection, consider soldering the copper pads.
3. Check connector alignment: Ensure connectors are properly aligned to make sure all sections light up correctly.
4. Cover soldered joints: Use heat shrink tubing to protect soldered joints and ensure durability.
Step 6: Test the LED Strip
Once your cuts and connections are complete, it's time to test your LED strip. Plug it back into the power supply and make sure all the segments light up evenly. If some sections don't work, double-check your connections.
- Tip: Testing the LED strip before final installation helps catch any issues early and ensures it still works, saving time.
Common Questions About Cutting LED Light Strips
1. Can I Cut LED Light Strips Anywhere?
No, you should only cut LED light strips at the designated cut marks. Cutting elsewhere will damage the circuit and could make the strip inoperable.
2. Do I Need to Solder After Cutting?
Not necessarily. Clip-on connectors are often used to reconnect cut segments, but soldering provides a more durable connection and ensures longer-lasting results.
3. What Happens if I Cut LED Strips Incorrectly?
Cutting in the wrong place will likely make that segment of the strip stop working. Be sure to follow manufacturer guidelines and always cut at the designated points.
4. Can I Reuse Cut LED Strips?
Yes, you can reuse cut sections, provided they were cut properly at the designated cut lines. To reuse them, you'll need appropriate connectors or soldering tools
Pro Tips for Cutting LED Light Strips
- Plan Your Layout First: Measure twice, cut once! Planning ahead minimizes mistakes.
- Check Power Supply Compatibility: Ensure that your power supply can handle the combined load if you're using multiple segments.
- Secure Your LED Strips: Use adhesive backing or mounting clips to keep your LED strips firmly in place, reducing wear and tear.
- Use Quality Connectors: Inferior connectors can lead to poor connections and may damage the strip over time.
Conclusion
Cutting LED light strips allows you to customize lighting solutions for any space, giving you full control over length and placement. By following the right steps, using appropriate tools, and being mindful of cut marks, you can safely cut and install LED light strips to fit your project perfectly.
Want More Tips? Explore our other DIY guides for more creative ideas to brighten your home and enhance your projects with LED technology!