CategoriesSponsors |
How to Install LED Strip Lights? LED strip lighting installed for commercial display
This is a detailed all-inclusive guide on LED strip light installation for DIY, professionals and amateurs alike. It has everything you need to know about how to install LED strip lights. This guide elaborates on all the knowledge, methods, and notes worth of attention. It also points out the common mistakes that many people would make. The LED strip installation guide includes the basic knowledge preparation, installation supplies and tools needed, and actual installation step by step. The detailed steps covered include:
LED Strip Light Installation Guide: Step by Step Installation Instruction
New to LED strip lights?
LED strip lights have many advantages. They operate on 12V or 24V DC, a very safe low voltage. They are flexible to form various shapes of lighting design and to be able to be applied on curved surface. With thin and flat low profile body, it is unique for strip lights to create lighting without seeing the lighting fixture. Strip lights are cuttable and linkable, and come with 3M double-sided back adhesive, making them very easy to be installed for indoor or outdoor applications. No matter for commercial or for residential, white LED strip lights are great for ambient lighting, accent lighting or tasking lighting. RGB and dream color strip lights are often used to create atmosphere. In summary, strip lights have a wide range of applications and are perfect for DIY lighting projects. Due to the above advantages, LED strip lights have become more and more popular. Many users want to install strip lights by themselves, so they can actualize their great ideas of strip lighting. It will be easy to do so after reading our LED strip light installation guide. After reading this all-inclusive guide, users are able to install strip lights like a professional, making their wish or DIY strip lights come true. After reading this article, if you are still not sure about how to install, please seek professional assistance. Now please follow us to see how to use LED strip lights. This strip light installation guide includes three parts:
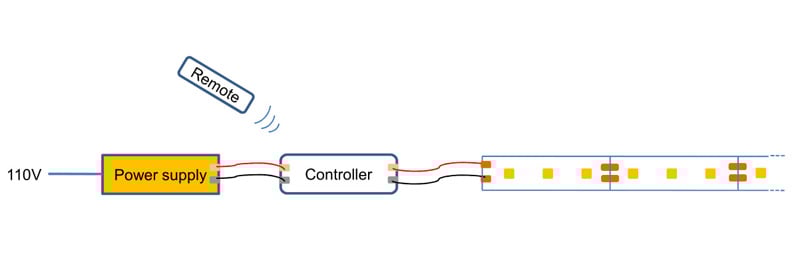
Each part of this guide can work independently. If you need to know only one part, you can jump to that part without having to read the whole article. First Part: The Basics Preparation for LED Strip Light InstallationHere you will learn the strip light installation layout. Similar to that different rooms have different layouts, this part explains the different wiring layout of strip lights, controllers, and power supplies and power feed points accordingly. How will the wiring layout affect your project? Layout plan will directly determine the installation job, and have indirect impact on the cost of your project. Although the light strip for a project can be in a fixed length, different wiring layout can result in different number of power supplies and controllers. Hence, the cost for parts and labor will be different. Sometimes the actual circumstance for wiring will require you to make selection between 12V and 24V strip lights, which in turn may necessitate different power supplies. In this sense, the knowledge in this part also helps get you prepared for choosing parts later. How to connect LED strip lights to power supply?First let's take a look at the installation basic theory, so we have an understanding for the wiring relationship among light strip, LED power supply, and LED strip controller. Simple installation1 .Connect one LED light strip to one power supplyA simple installation would need an LED light strip, a proper power supply, and, in some cases, LED wires. Connect one end of the power supply to the low voltage 12V LED strip or 24V LED strip, and the other end to the 110V home electricity. Power supply should provide proper voltage and enough amperage for the light strip. When connecting power supply to light strip, be sure to pay attention to the polarities(+, -). Connection between wrong polarities could damage LEDs. 12V and 24V LED strip lights are not direct wire strip lights. Do not connect them directly to the 110V electricity.  The picture below is a simple installation for one light strip and power adapter. Just need to plug DC male connectors into the female, don't need any other connectors. As long as it plugs in, you don't need to worry about the + or - polarity.  2. Connect two LED light strips to one power adapterOne power adapter can provide power to two light strips. You only need a two-way power splitter to connect to the two light strips. Please note the light strip wattage cannot exceed the output of the LED strip light adapter. A power adapter is usually under 120W. So each light strip can be 50W at most. 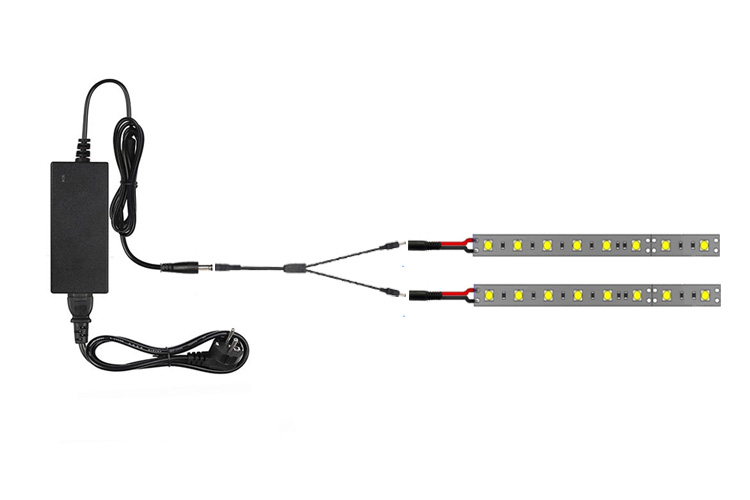 3. LED Strip light installation with controller.
 Large installation: how to connect multiple LED strips to one power supply.In above picture, two tunable white LED strips are installed continuously and connected to one power supply through a controller. The power is provided through two feed points. It is installed this way because voltage drop along the light strip would make the rear part of the light strip not as bright as the front part. Due to the voltage drop phenomenon, strip lights are designed to a maximum operating length when powered from one end. 12V strip lights run up to 16.4ft (5m). 24V version can be 16.4ft (5m) or 32.8ft (10m), depending on its wattage of unit length. To put in other words, the length of a light strip is related to its designed voltage, current, and wattage.
Two major factors that determine the maximum operating length of LED strip light A light strip works fine before the voltage drop adds up to a threshold. Beyond the threshold, the brightness level of LEDs drops so much that it becomes noticeable to the naked eyes. The longer the light strip is, the larger the voltage drop. LED strip lights with constant current devices resolve the voltage drop issue, to certain degrees. The constant current devices maintain the current steady for LEDs along the strip, so the strips can run 10m or 20m long. The type of strip lights are referred to as current controlled strip lights, or constant current strip lights. But even this type of strip lights cannot exceed certain operating length due to the factor below. 2. Electric current overload. Electric current adds up along the light strip because LED strip segments are designed to operate on parallel circuits. One segment is a cuttable unit. The flexible print circuit(FPC) board is designed for electric current up to a limit. If the lights strip is too long(the segments are too many), the current will add up to exceed the current limit that the FPC board can handle, causing current overload. Current overload will cause too much resistive heating and hence the LED strip damage. This is also why 12V strip lights are made for 16.4ft(5m) in length. Our current controlled strip lights are also designed up to the length under which the strip can safely handle the current. The reel being sold is in the maximum length that can be installed for a continuous run. If you want to install longer than the designed maximum length, extra electricity feed points would be needed. Therefore, our recommendation is to provide power for every 16.4ft(5m) 12V strip lights if installed continuously. Otherwise the conductors on the light strip will be adversely impacted by too large current flow. If you install 12V LED strips up to 32.8ft(10m), the power can be provided from the middle point, in such a way that the light strip runs within the 16.4ft(5m) limit on both directions. Use LED wire with larger current rating for this installation. How to set up LED strip lights?Here we'll explain how to set up LED strip lights for the situations where 16.4ft(5m) and 32.8ft(10m) strips are used for installation. The setup or layout of installation is checked against the 16.4ft or 32.8ft rule. The rule states: when powered from one side, a 12V or 24V light strip cannot continuously run longer than 16.4ft or 32.8ft. Beyond that point, the light strip will have issue of less bright LEDs and current overload on the strip. But indoor indirect lighting projects often requires installation of light strips longer than 16.4ft or 32.8ft. For example, a 15ft x 15ft (4.5mx4.5m) room has a perimeter of 59ft(18m). How to set up LED strip lights for this room? Some useful wire layout methods can resolve this issue. A common installation practice is to use room corners as power feed points, no matter it is to install an extra power supply or to extend power cords from the existing power supply. Why use room corners? It is because in most cases, LED strip lights cannot turn 90 degrees by themselves at room corners, and must be cut and connected by way of soldering or using solderless LED connectors. How to wire LED strip lights.The below examples for layout LED strip light installation illustrate how to wire LED strip lights in different ways. The wire setup for LED strip lights explained in the examples below can be utilized as setup guide or rules and with adjustment, be used for installation for projects or rooms with different layouts. Because the unit of power wattage for many strip lights is specified in w/m, for your convenience, we provide units in both foot and meter. The conversion rate is 1 meter = 3.28 feet. 1. A room measured 15ft x 15ft (4.5m x 4.5m). High lumen output 24V LED strip lights, 5.5w/ft (18w/m).  The use of LED strip lights at ceilings as indirect lighting is an aesthetic design of main lighting for a room. Usually indirect main lighting uses strip lights of high output. It is important to plan installation in such a way that every side is under the length limit of 16.4ft(5m). For the 15ft x 15ft (4.5m x 4.5m) room, we connect four LED wires to a controller, and extend one LED wire to each corner of the room, with each wire connected to a 15ft(4.5m) long LED strip. This wire layout easily sets each side under the 16.4ft(5m) limit. The current load for each LED wire is 3.44A. So the layout would use an LED controller with four output channels, with larger than 3.44A current for each channel. Our classic LED controllers of 4x5A, 4x6A, or 4x8A have enough output power and are perfect for this installation. The strip lights we use have 5.5w/ft (18w/m) high lumen output, great for indirect main lighting for room. Light strips connected to different channels of a controller are not to be connected together. You want to make sure that the channels of a controller do not connect one another in any way. 2. A 11.5ftx15ft (3.5 x 4.5m) room. 24V LED strip lights, medium lumen output, 3w/ft (10w/m).  This is another LED strip wire layout for indirect lighting. The strip lights have an output for 800-1000lm/m, a medium output light strip that usually requires the maximum continuous run to be less than 16.4ft(5m). We choose the light strip with 3w/ft(10w/m). Considering the layout as 11.5ftx15ft (3.5m x 4.5m), we divide the room by the diagonal line into two sections. With a long wall 15ft and a short wall 11.5ft, each section has a total length of 26.5ft(8m), which is longer than 16.4ft(5m). So we feed the strip lights from the corner where long and short walls meet. The maximum length of light strip powered from one side is 15ft along the long wall, less than 16.4ft(5m). In the above wire layout, each power feed point has a current load 1.44A+1.88A=3.32A. Current load for the whole installation would be 2 x 3.32A=6.64A. We choose a classic controller of 1 x 8A output. The controller has one channel, which can be connected with two LED wires from the two feed points. Or we can use a block terminal to connect both LED wires. 3. A room with irregular layout. The perimeter is 82ft(25m) in total, as below. Use 24V RGB LED strip lights, medium output, 3.66w/ft (12w/m).  With this irregular layout, we are going to plan a classic large installation RGB strip lights. The strip is 24V, with 3.66w/ft (12w/m) medium output. The maximum continuous run for this light strip is designed at 32.8ft(10m). As illustrated in the wiring layout above, we power the strip lights from three feed points: A, B, and C, with each side has a length of 15ft(4.5m), 24.6ft(7.5m), 24.6ft(7.5m), and 18ft(5.5m). None of them exceed the designed length of 32.8ft(10m). Because RGB LED wires are 4pin, we can split each channel of the RGB controller by using splicing connectors or terminal block connectors. Four harnesses of 4pin RGB wire cable are extended from the splicing connectors and placed at the three feed points, with two harnesses being placed at point B and one harness at point A and C. Choose the right RGB controller. It is important to calculate the largest current load at the feed points. Point B has the largest current load, 3.75A for each wire harness. Therefore, controllers of 4x5A, 4x6A, or 4x8A would work for the installation with no issue. Second Part: The Supplies and Tools Needed for LED Strip Light Installation.In this part we discuss the supplies and tools needed for LED strip light installation, including light strips, power supply, LED controller, LED connectors and wires. Strip light aluminum extrusion profile is optional for strip light heat management. Tips and guidance are provided for choosing supplies. You can refer to their respective categories for more detailed information on the supplies. 1. Choose LED strip lights(single color, tunable white, RGB, RGBW, RGB+CCT etc.) Whether it is for living room, kitchen, office or commercial spaces, LED strip lights now can provide pleasant lighting for anywhere. The little LEDs can not only provide accent lighting for an area, but also can light the whole room beautifully. Modern LEDs are absolutely bright enough for any projects. There are many factors to be considered before buying LED strip lights. For white light strips, you need choose color temperature, brightness, CRI etc. For colored light strips, there are red, green, blue, or multi-color changing RGB, RGBW, RGB+CCT, etc. How to choose the best strip light for your project, please refer to the article in the strip lights category. 2. 12V, 24V power supplies, including power adapter and switch power supply. LED power supply is also interchangeably called LED driver, or LED transformer. Power supplies are connected to the 110V home electricity and provide LED strip lights with 12V or 24V DC power. A proper power supply should have not only proper voltage(12V or 24V) and current output, but also enough wattage to be able to power the light strips. In order to choose a proper LED strip light power supply, the wattage of the strip lights to be installed is calculated first. Formula: Strip light wattage = strip light length x wattage/meter. The power usage of the LED strips to be installed equals LED strip's length times wattage per unit length. For example, for a 5m 24V LED light strip, 10w/m, what power supply should we use? The answer is 60W. The power usage for the LED strip is 5m x 10w/m = 50W. But, power supply is not supposed to be used in full load. Usually a 15-20% more capacity should be set aside. So the power supply should be 50w*1.2=60W. LED strips work on direct current(DC), so only DC power adapter or power supply can be used. AC to AC power transformers are not appropriate. They will destroy LED strips. 3. LED controller. LED controller can adjust brightness level, and manage LED colors. As discussed, LED controllers are optional for single color strip lights, but are required for tunable white, RGB and RGBW strip lights. Do not underestimate the importance of matching capacities of different electrical parts when installing strip lights. Some users connect too long strip lights on a simple LED controller. It will damage the controller. Please use the formula below to calculate the current drawn by strip lights: Current in amperage(A) = Total wattage of LED strips connected(W) / Voltage(V) For example, if a 18w/m RGBW LED strip is installed for 25m long, the total power adds up to 450W(when all colors and white LEDs are on full brightness). 450W divided by 24V, the current is 19A, which is almost 5A for each channel(R ,G ,B ,and W)! For a simple controller, the current would be too large. 4. LED strip connector and LED wire. Choose the right solderless LED connectors according to the type and width of your LED strips. There are two important specifications when choosing LED strip connectors.
When buying LED connectors, make sure the number of pins and the width match those of the LED strip. Otherwise the connectors won't work. LED connectors are suitable for both 12V and 24V LED strip lights. Common LED types include 3528, 2835, 2216, and 5050. Although LED types are different, the strip light wiring method is similar. So, the connectors are the same for LED strips of different LED types. During strip light installation, there are many types of connections, including strip to strip connection, strip to power supply connection, strip to controller, controller to power supply connection, etc. In general, we connect through two methods: by soldering or by using solderless LED connectors.
For more information on how to choose LED connectors and LED wire, please refer to the LED connector category.
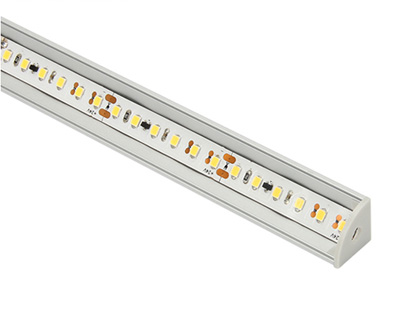
It is also important to choose LED wire, which will make your installation smooth and fast. Quality LED wire should meet your installation needs, and have satisfying features such as enough current rating, well-insulated, fire resistant etc. 5. Aluminum extrusion profile for LED strip light installation. LED Aluminum profile is optional for installing LED strip lights. It has many advantages to use aluminum profile for strip lights.
Like any LED lights, LED strip lights generate heat during operation. LED is sensitive and overheat will cause decrease in its brightness as time goes by. Especially for development in recent years, LED strip lights have developed higher output models to meet different needs of application. These strip lights are in special need for better heat management. To avoid overheat, all high output LED strip lights are recommended using cooling system. Anodic oxide aluminum is the best choice. Not only it cools down LED strips, but also its anodic oxide film can prevent possible short circuits incidentally caused by any bare metal on LED strips.
6. Typical list of supplies and tools for strip light installation.
Third Part: The Actual Steps of LED Strip Light Installation.In this part we explain the actual steps of installing LED strip lights. The steps discussed include prepare mounting surface, measure and cut light strip, connect strips together, connect strips to controllers and power supplies, etc. It covers the practical installation knowledge as well as common mistakes to avoid. Step 1. Test supplies to be installed.Before installation, it is recommended testing the supplies including LED strips and controllers. The test assures that the strip lights is ready and functional, the color and color temperature are what you want, the LED controllers work well and can bring up the lighting effects you want. Step 2. Prepare mounting surfaces.Well-prepared mounting surfaces will facilitate fast and secure mounting of strip lights. To obtain optimum adhesion, the mounting surfaces or bonding surfaces must be clean dry and well unified. Surface preparation includes removing dirt, oil, and other contaminates. A typical surface cleaning solvent is isopropyl alcohol(IPA) based solution, 70% IPA and 30% water. For oily substrate, use acetone instead of IPA. Use proper safety precautions for handling solvents. Apply adhesion primer to promote stronger bond. In some cases, abrading the substrate surface can help remove oil layers and other contaminates. While waiting for the prepared surfaces to dry, we can continue onto next steps. Step 3. Measure length.Previously, in the first part when planning layout of strip light installation, you may have measured the total length of light strips needed. Now we need measure the length for each leg of installation. As mentioned before, most times the strip lights need to be cut where it makes turns. Take notes of your measurements as you will need them when cutting LED strips later. Step 4. How to cut LED strip lights?Cutting LED strips is the easiest thing. Anyone who can use a pair of scissors can do it. Cutting lines are marked by each cuttable segments on LED strips. Most common LED strip lights can be cut every three or six LEDs. Our 5050 white strip lights are specially designed to be cuttable in very short increments, every LED or every two LEDs. The short cutting increments are perfect for accurate length of installation. Cutting should be exactly along the cutting line, which ensures both cutting ends of the strip have enough size of copper pads. Copper pads work as soldering base for soldering connection, or as connection points for solderless LED connectors. As you cut, you can clearly see the electrical polarity marks + and - for single color strip lights. For tunable white, RGB and RGBW strip lights, the marks are usually positive mark + and color marks, G(Green), R(Red), B(Blue), WW(Warm white), CW(Cool White). The color marks are negative polarities.  + and - on single color LED strip lights

+ and color marks on RGB LED strip lights Step 5. How to connect LED strip lights together?Connect linkable LED strip lights mainly for making 90 degree turns or straight strip to strip connections. 90 degree turn connections are common for corner installation. 1. Fast solderless LED connectors. LED strip lights can be fast connected using solderless connectors. To use LED strip to strip connectors:
2. Repeat the above steps to connect another strip on the other end of the connector. Please make sure the polarities match correctly for light strip and connector. Wrong polarity connection can cause damage to strip lights and connectors. 3. Where light strips need to make turns, don't twist LED strip. If there is trouble making turns, it is better to cut off the light strip and use flat and short LED connectors to make turn connections. 4. Soldering is sometimes necessary to connect strip lights together, especially when there is difficulty using solderless connectors. When you cannot find a suitable connector, you can make a professional connection by soldering. Solder connection is more aesthetic. 5. Specialty waterproof strip connectors are designed for quick connecting waterproof strip lights(IP65, IP67, IP68). Step 6. How to connect LED strips to power supply?For single color strip lights, you can connect LED strips to power supply directly, connecting V+ to V+, V- to V-. Must pay attention and correctly match the electrical polarities. Wrong polarity connection can destroy the strip lights. Optionally, an LED dimmer can be place between LED strip and power supply to adjust strip brightness level.  It is easier to connect power adapter to LED strip. Both have a coaxial DC connector. Just plug the male DC connector with female DC connector. For more information on how to connect power adapter to light strip, please refer to the power adapter category. Connect RGB LED strip to RGB controller.RGB LED strips must operate with the help of RGB controller, which takes care of the color management function. Connecting RGB strip lights to controller can be done in different ways, depending on the type of RGB controller. One type of controllers have wire connecting terminals, marked with +, G(green), R(red), B(blue), similar to the marks on RGB strip lights. In this case, wire the RGB LED 4 pin cable to the terminals, positive wire to terminal +, G wire to terminal G, R wire to terminal R, and B wire to terminal B. Then we connect RGB controller to power supply by power cable or DC connector. The positive cable of power supply connects with positive input terminal on the controller, and the same with negative connection. Another type of RGB controllers have 4 pin connectors. Its connection with RGB strip lights is easy, by joining the 4 pin connectors on the controller with the 4 pin connector on light strip together. How to connect LED strip lights in series?LED strip lights are designed to run continuously up to a certain limit due to voltage drop and current load issues. This limit put challenges for connecting LED strip lights in series to achieve longer installation. In former parts we create some example wiring layouts to work around the issues. Now we have a look at the actual wire connections. We use RGB strip light installation as example because it is the most complicated among the strip light installations. RGB strip lights are set to run 16.4ft(5m) or 32.8ft(10m). For longer RGB strip light installation, RGB LED amplifiers are used to amplify control signals. Below are wiring illustrations for installation with RGB controller and amplifier.  For installation in above illustration, RGB controller and LED amplifiers are wired to the same power supply.  As installation in above wiring layout, RGB controller and LED amplifiers are wired to different power supplies. Step 7. How to power LED strip?Connecting LED strip light to mains is done through connecting strip light to LED power supply then to the 110V home electrical system. Actually it is the power supply that directly provides power to LED strips. The input terminals for power supply are marked with L, N, G, with L for live wire, N for neutral wire, and G for ground wire. Ground terminal is often marked with grounding symbol. Through the three power wires L, N, G, power supplies are connected to electrical system.  Step 8. Test the connections.Previous to mounting LED strips, it is very important to test all the connections we made in previous steps. The test is to make sure all the connections work well, preventing surprise after we mount the strip lights. After the LED strip is applied with 3M adhesive tape, it would be very difficult to take it down. Even you managed to do so, the LED strip may have potential damages caused by stress during taking it down. In addition, you would not be able to establish a secure bonding if you use the 3M adhesive tape for the second time. Step 9. Mount LED strip lights, controller and power supply.How to hang LED strip lights?There are two ways to mount LED strip lights. One way is to utilize 3M double-sided tape, and the other way is to use mounting brackets.
9.1 Peel and stick installation by using 3M tape. Application of the light strip two feet a time can prevent the light strip from being messed up by entangling themselves or sticking to dust etc. Tips: using a file cleaner to peel off the release liner of 3M tape is very helpful if you need to peel off a lot of times. To avoid applying too much pressure on LEDs when sticking the LED strip. The amount of adhesive-to-surface contact developed has direct impact on bond strength. Firm application pressure develops better adhesive contact and thus improves bond strength. But don't press too hard, especially on LEDs and resistors. Pressure should be only applied on the areas where there are no LEDs or other electrical components. A big rubber pad like eraser can be helpful.
9.2 Using strip mounting brackets. It is also often used for indoor applications where LED strips are hidden or invisible, like ceiling cove lighting. It could be hard to prepare application surface full of dust for extended length on the ceiling coves. Furthermore, the mounting brackets won't block the lights from LEDs. Last, mount the LED controller and power supplies. Turn on the power, and enjoy your strip lighting! After reading this LED strip installation guide, you can install strip lights like a professional now. Should you have any other questions, please do not hesitate to contact us. We are always here to assist you. |